A home inspection is a thorough visual evaluation of a property’s major systems and components, designed to identify issues that could affect safety, structural integrity, or value. For first-time buyers, home inspection day what to expect is one of the most searched questions in the entire home-buying process. The reason is simple: this single appointment shapes your negotiation position, your repair requests, and sometimes your decision to walk away. Understanding the home inspection process before you arrive turns a stressful day into a productive one.
What does a home inspector check on inspection day?
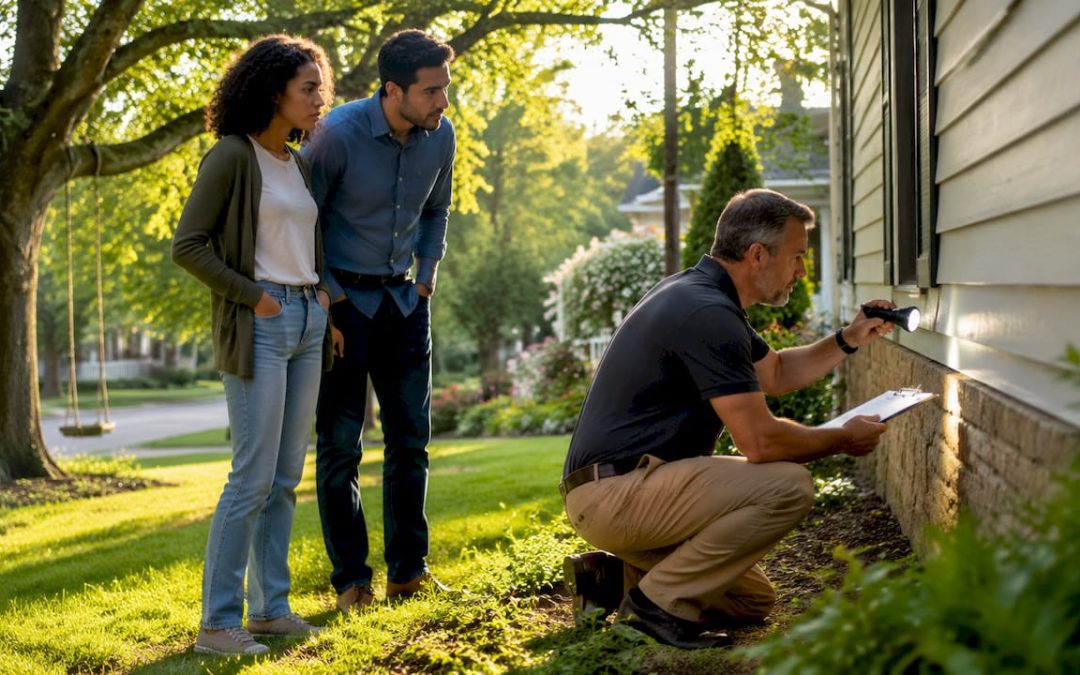
A licensed inspector evaluates the home from the ground up, covering every major system a buyer will inherit. The scope is wide, and knowing what falls inside it helps you follow along during the walkthrough rather than standing confused in a corner.
Exterior systems checked:
- Roof condition, flashing, gutters, and downspouts
- Siding, trim, and exterior paint
- Foundation, grading, and drainage patterns
- Driveways, walkways, decks, and porches
Interior systems checked:
- Electrical panel, wiring, and outlets
- Plumbing supply lines, drains, and water heater
- HVAC equipment, filters, and ductwork
- Kitchen appliances included in the sale
- Attic insulation, ventilation, and signs of moisture or pests
- Crawlspace structure, moisture barriers, and framing
Home inspections typically last 2.5–4 hours, and 86% uncover at least one significant issue. That statistic means the odds are strongly against a perfectly clean report, so buyers should expect findings rather than be surprised by them.
Inspectors use specialized tools beyond a flashlight and clipboard. Infrared cameras detect moisture behind walls and heat loss around windows. Drones photograph steep or unsafe roofs. Moisture meters flag hidden water intrusion in basements and crawlspaces. Inspectors use drones or walking sticks when a roof is too steep or damaged to walk safely.
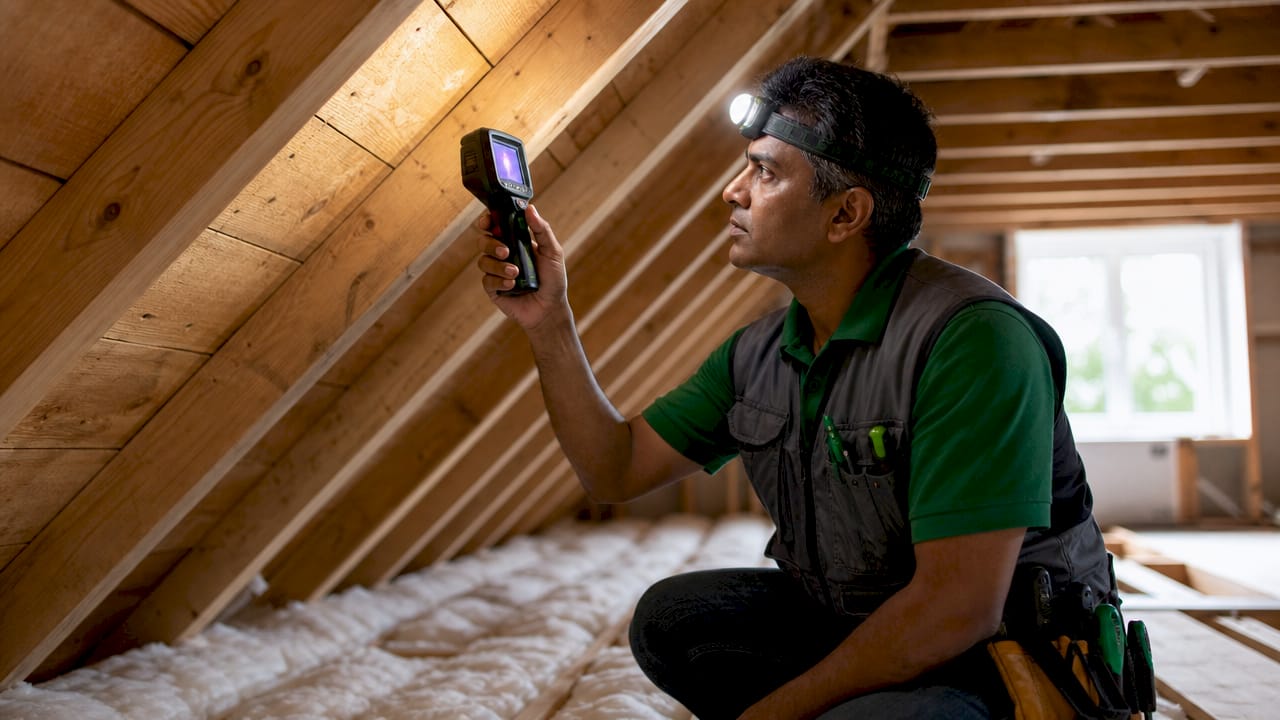
Pro Tip: Ask your inspector upfront whether they use thermal imaging. Not every inspector includes it by default, and it can reveal hidden moisture or electrical hot spots that a visual check alone misses.
When should you schedule the home inspection?
Timing the inspection correctly protects your negotiating window. Home inspections usually occur within the first 7–10 days of escrow, giving buyers time to review findings and request repairs before deadlines close in.
Follow this sequence to stay on track:
- Sign the purchase agreement. Your inspection contingency period starts here. Missing this window can cost you the right to negotiate based on findings.
- Book the inspector within 24–48 hours. Quality inspectors fill their calendars fast, especially in competitive markets like St. Louis Metro and Southern Illinois.
- Confirm access with the seller. Utilities must be on. Locked areas like crawlspaces and electrical panels must be accessible. Coordinate through your agent.
- Block 3–4 hours on your calendar. Larger or older homes run longer. A 1970s home with original wiring and plumbing needs more time than a newer build.
- Plan to arrive before the inspection ends. You do not need to be there for the full duration, but you must be present for the final walkthrough.
Scheduling early also gives you time to bring in specialists if the inspector flags something that needs a closer look, such as a structural engineer for a cracked foundation or an HVAC technician for an aging furnace. Use a step-by-step scheduling guide to avoid missing critical booking windows.
What to bring for inspection day as a buyer
Preparation separates buyers who leave with clarity from those who leave confused. The home inspection checklist for buyers is short, but each item matters.
Bring these with you:
- A smartphone or camera for photos of flagged areas
- A notes app or small notebook for verbal comments the inspector makes
- Comfortable, closed-toe shoes suitable for attics, crawlspaces, and uneven terrain
- Your list of questions written out in advance
- A copy of the seller’s disclosure statement to cross-reference findings
Buyers benefit from preparing practical questions before arriving. Good questions include: Which issues are safety hazards versus normal wear? What maintenance should I budget for in year one? Which defects require a licensed contractor versus a handyman?
Pro Tip: Arrive at least an hour before the inspection ends, not at the very start. The final 45–60 minutes is where the inspector summarizes findings in person, and that conversation is worth more than reading the report alone.
Wear clothes you do not mind getting dusty. Attics and crawlspaces are part of the inspection, and a good inspector will invite you to see conditions firsthand when it is safe to do so. Seeing a wet crawlspace floor in person hits differently than reading “moisture detected” in a report.
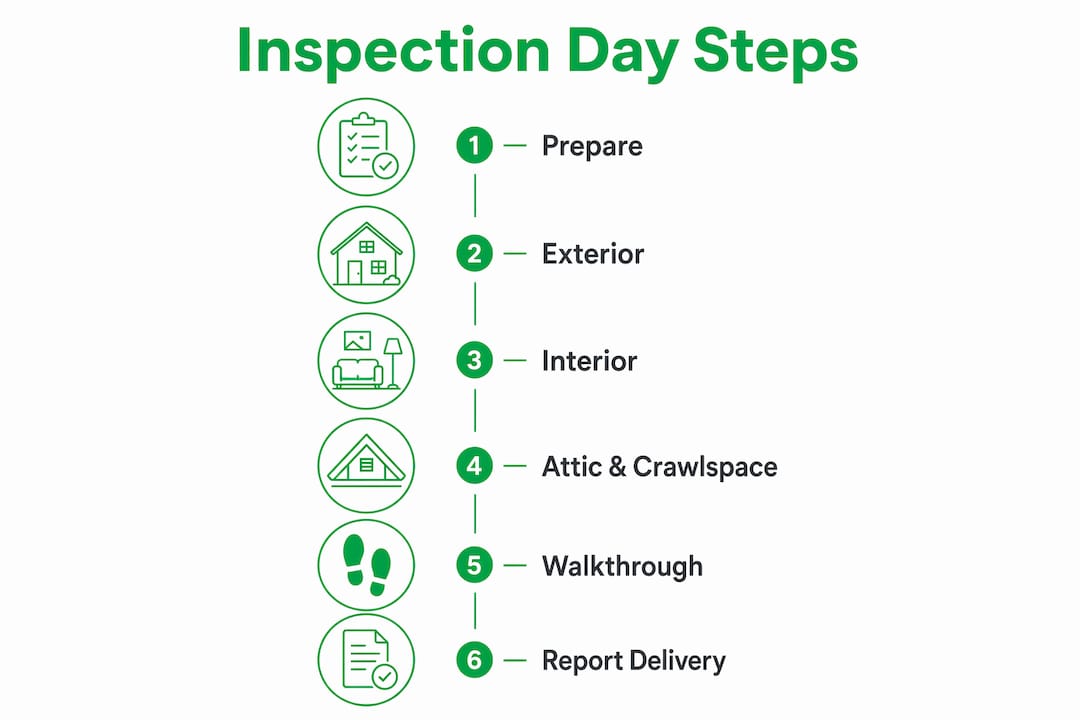
What happens during the walkthrough and report delivery?
The inspection follows a systematic path: exterior first, then interior, then attic and crawlspace. The inspector works methodically and does not stop to explain every finding in real time. That explanation comes at the end.
Arriving for the last 45–60 minutes gives you the live verbal walkthrough where the inspector explains high-priority issues and safety hazards directly. Buyers who attend the live walkthrough gain better understanding than reading the report alone. The inspector will show you where the main water shutoff is, how to reset a tripped breaker, and what that stain on the ceiling actually means.
The written report follows within 24–48 hours. Reports often contain 30–50+ pages with photos, severity ratings, and professional recommendations. Here is how findings are typically categorized:
| Category | What it means | Typical buyer action |
|---|---|---|
| Safety Hazard | Poses immediate risk to occupants | Request repair before closing |
| Major Defect | Significant system failure or structural concern | Negotiate repair credit or price reduction |
| Minor Defect | Small maintenance item, normal wear | Note for future upkeep, rarely negotiated |
| Informational | Background detail, no action required | File for reference |
Reports include prioritized categories so buyers can focus on what matters most. Modern digital reports from inspectors like Jhunthomeinspections include photos and thermal imaging images tied directly to each finding. Understanding inspection report terminology before you read the document saves hours of confusion.
Pro Tip: Read the Safety Hazard and Major Defect sections first. Do not start at page one and read straight through. The report is a reference document, not a story.
How do you use inspection findings in negotiations?
Buyers save an average of $14,000 using inspection findings in negotiations. That figure reflects how much leverage a thorough report creates when used correctly.
Focus your negotiation on three categories:
- Safety hazards. Faulty wiring, gas leaks, missing handrails on stairs, and carbon monoxide risks are non-negotiable. Request repair before closing, not a credit.
- Major defects. A failing HVAC system, a leaking roof, or a cracked foundation affects the home’s livability and value. These warrant either a repair credit, a price reduction, or a contractor quote before you proceed.
- Structural concerns. Foundation movement, compromised framing, and drainage problems that direct water toward the home are the issues that cost the most to fix.
46% of buyers secure repairs or price reductions based on inspection findings. That means nearly half of all buyers who get an inspection walk away with a better deal than they started with.
Skip the cosmetic items. Scuffed paint, worn carpet, and dated fixtures are visible and already priced into the offer. Raising them in negotiations signals inexperience and wastes goodwill you need for the real issues. A home inspection is a visual assessment, not a pass/fail. Use it as an objective view of the property, not a reason to panic over every imperfection.
Your real estate agent is your partner in this step. Share the report with them before you draft any repair requests. They know what sellers in your market typically accept and how to frame requests without blowing up the deal.
Key Takeaways
Home inspection day gives buyers the clearest, most objective picture of a property’s condition before they commit to the purchase.
| Point | Details |
|---|---|
| Attend the final walkthrough | The last 45–60 minutes with the inspector delivers context no written report can fully replace. |
| Schedule within 7–10 days | Booking early protects your negotiation window and leaves time for specialist follow-up. |
| Focus on safety and major defects | Skip cosmetic issues and negotiate only on hazards, major failures, and structural concerns. |
| Read the report by category | Start with Safety Hazards and Major Defects before reading the full document. |
| 86% of inspections find issues | Expect findings. A long report does not mean a bad house. It means a thorough inspector. |
What I’ve learned after years of watching buyers navigate inspection day
Most first-time buyers make the same mistake: they try to attend the entire inspection and end up exhausted, anxious, and fixated on a cracked outlet cover while the inspector is flagging a failing sump pump in the basement. The most critical participation is near the end, during the inspector’s summary. The final walkthrough reveals details like shutoff locations and HVAC operation that a report simply cannot convey.
The second mistake I see consistently is buyers trusting a seller-provided inspection report. An independent home inspector is critical to avoid conflicts of interest. A seller’s inspector has a different client. Yours should have only one: you.
My honest advice is to treat the inspection as a learning session about the home, not a verdict on whether to buy it. Ask the inspector which issue they would fix first if it were their house. That question cuts through the noise faster than reading 47 pages of report language. Homes built in the 1970s often carry electrical concerns from that era. Homes from the 1990s show different risk patterns. Knowing your home’s age helps you ask smarter questions before you even walk in the door.
Show up curious, not anxious. The inspector is on your side.
— JOHN
Trusted inspection services for St. Peters and University City buyers
Buyers in the St. Louis Metro area and Southern Illinois deserve an inspector who shows up prepared, communicates clearly, and delivers a report they can actually use.

Jhunthomeinspections provides professional home inspections using thermal imaging, drones, and detailed digital reports. Reports are delivered within 24 hours, often on inspection day itself. The team specializes in first-time buyers, veterans, and low-income families who need clear answers, not confusing technical documents. The proprietary Create Request List™ tool helps buyers and agents turn inspection findings into organized repair requests without the back-and-forth. Schedule your home inspection in St. Peters or University City and get the thorough, unbiased evaluation your purchase decision deserves.
FAQ
How long does a home inspection take?
A standard home inspection takes 2.5–4 hours depending on the size and age of the home. Larger or older properties with more systems to evaluate run toward the longer end of that range.
Do buyers need to attend the full inspection?
Buyers do not need to be present for the entire inspection. Arriving for the final 45–60 minutes to join the inspector’s verbal walkthrough is the most valuable use of your time.
What are the most common issues found in home inspections?
Common issues include roof problems at 19.7%, electrical concerns at 18.7%, and window defects at 18.4%. These three categories account for a significant share of all findings across inspections.
Can a buyer negotiate after the inspection?
Yes. Buyers can request repairs, a price reduction, or a credit at closing based on inspection findings. Focus requests on safety hazards and major defects for the strongest negotiating position.
What should buyers bring to the inspection?
Bring a smartphone for photos, a notes app or notebook, comfortable closed-toe shoes, and a written list of questions. Reviewing the home inspection checklist before you arrive helps you stay focused during the walkthrough.
Recent Comments