
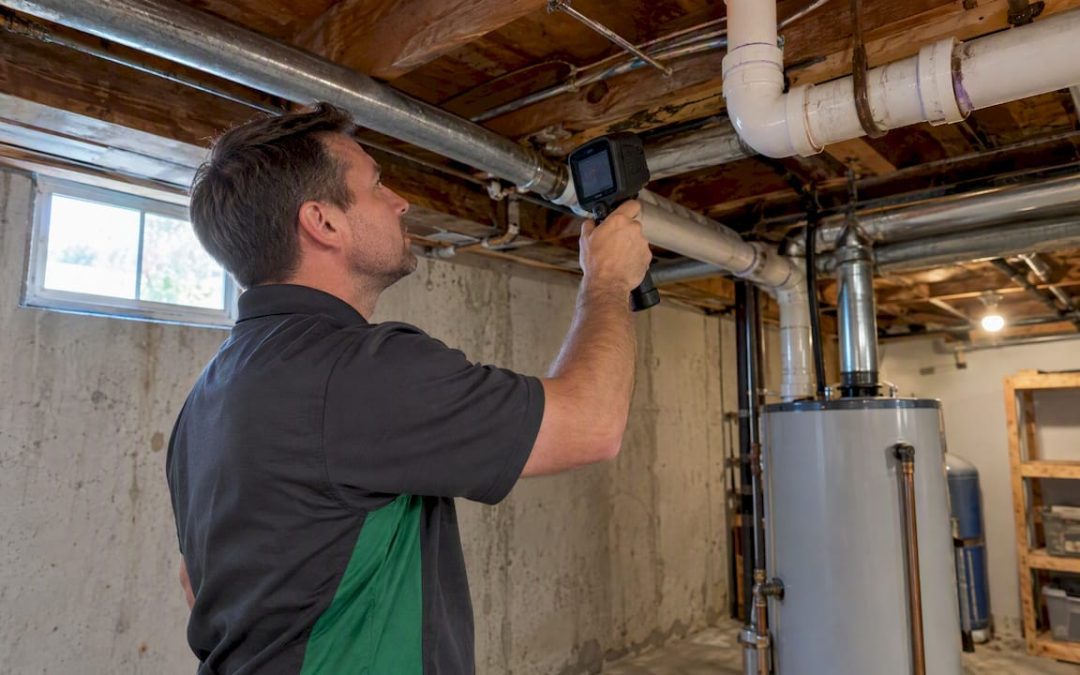
Yes, thermal imaging often strengthens a home inspection by surfacing leads that a visual walkthrough alone would miss, including damp framing behind a bathroom wall or a scorching connection inside an electrical panel. Those leads are not proof on their own. Every thermal anomaly still needs confirmation with a moisture meter, a closer look, or a qualified electrician before anyone calls it a defect.
TL;DR:
- Thermal imaging can identify hidden moisture, insulation issues, and electrical hot spots, but each anomaly requires confirmation through additional testing.
- Accurate interpretation depends on inspector training, local environmental conditions, and verifying thermal leads with moisture meters, visual checks, or professional assessments.
- False positives may result from reflections or shadows, and environmental factors like weather or dirt can skew results, making context and follow-up vital.
- The cost of thermal imaging typically ranges in the low hundreds of dollars as an add-on, especially valuable for homes with water issues, storm damage, or concealed systems.
- Proper preparation, such as stable indoor temperatures and accessible test areas, enhances the reliability of thermal scans in detecting actual problems.
Table of Contents
- What Thermal Imaging Detects and Typical Inspection Uses
- How Inspectors Interpret Thermal Images and Verify Findings
- Limitations and Environmental Factors That Affect Accuracy
- What the Inspection Report Will Show and Next Steps
- Cost, Value, and When to Add a Thermal Scan
- Types of Thermal Cameras Inspectors Use and Their Trade-Offs
- Preparation Steps Homeowners Should Take Beforehand
- Common False Positives and False Negatives to Watch For
- Standards and Certifications for Thermal Imaging Inspectors
- How to Read a Thermal Image as a Homeowner
- How Hunt Home Inspection Puts Thermal Imaging to Work
- Ready to Add Thermal Imaging to Your Inspection?
- FAQ
- Sources
What Thermal Imaging Detects and Typical Inspection Uses
An infrared camera reads surface temperature, not moisture or electricity directly. That distinction matters, but in practice it still points inspectors toward real problems that would otherwise stay hidden behind drywall or insulation.
During a passive scan, a camera typically catches:
- Hidden moisture or plumbing leaks, which often show as cooler patches where water has displaced warmer, dry material
- Missing or compressed insulation, visible as streaky or patchy temperature variation across a ceiling or wall
- Air infiltration and thermal bridging at window frames, rim joists, and where studs meet exterior sheathing
- Electrical hot spots at panels, outlets, and junction boxes caused by loose connections or overloaded circuits
- HVAC or duct leaks that show as unexpected warm or cool streaks along supply lines or register boxes
Inspectors typically scan the attic, roof deck from below, exterior wall sections, windows and doors, the electrical panel, and HVAC registers and returns. A kitchen ceiling with a faint blue blotch near a second-floor bathroom, for example, often traces back to a slow supply line leak rather than roof damage. A bright white dot on a breaker inside the panel can mean a connection running far hotter than its neighbors, worth flagging for an electrician before it becomes a fire risk.
None of these images diagnose the problem by themselves. They tell the inspector where to look closer, which is exactly how thermal imaging fits into a broader inspection scope alongside moisture meters and visual checks.
How Inspectors Interpret Thermal Images and Verify Findings
A thermal camera measures contrast in surface temperature. It cannot tell you whether that cooler patch on a wall is wet insulation, a missing stud, or just a shadow from an air vent. That gap between what the camera shows and what it means is where inspector training does the real work.
A typical verification sequence looks like this:
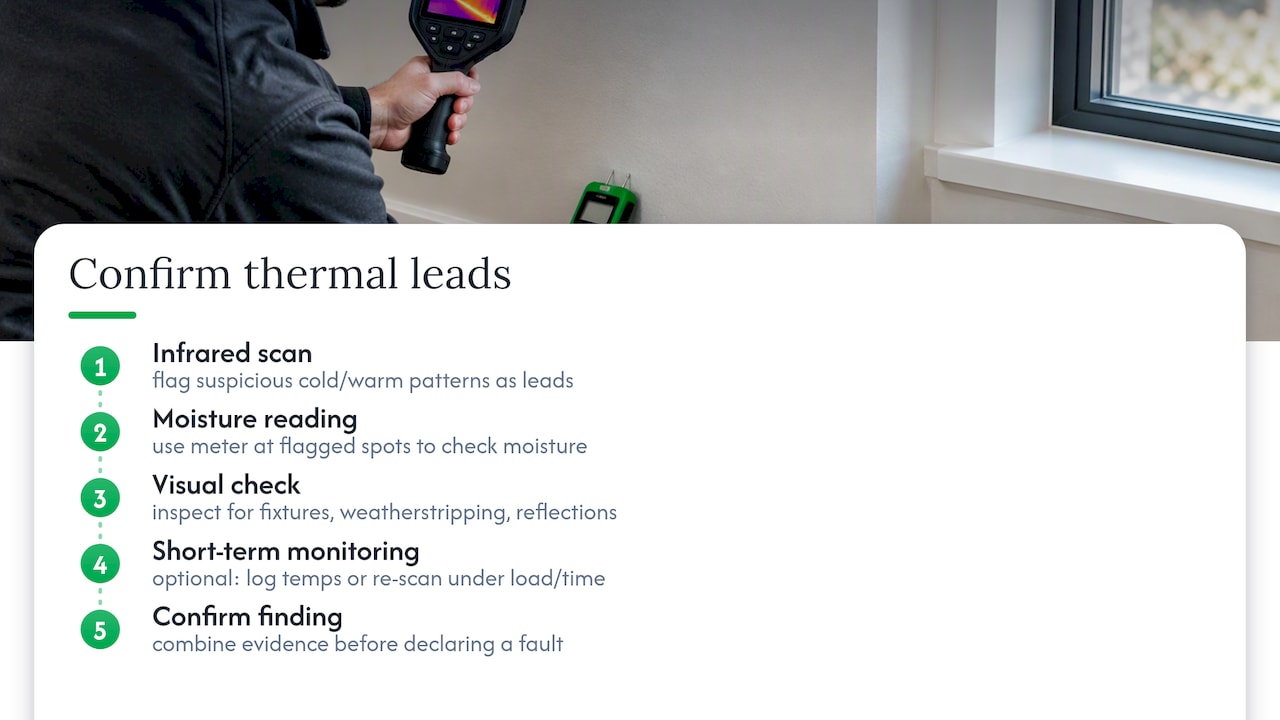
- Flag the anomaly during the passive scan and note its location and apparent temperature differential
- Confirm with a contact moisture meter when dampness is suspected
- Open a small access point or test a few inches of drywall when the lead is strong and accessible
- Monitor the area over a short period if conditions do not allow immediate confirmation
- Refer electrical hot spots to a licensed electrician for load testing and panel inspection
Building science knowledge keeps this process honest. An inspector who understands thermal bridging, reflected heat off glass, and how wall assembly layers behave can tell the difference between a genuine moisture lead and a cold draft pattern that looks similar on screen. According to InterNACHI’s guidance on infrared thermography, the camera works best when paired with moisture meters and clear documentation of what was tested and how.
Pro Tip: Ask any inspector offering thermal imaging how they verify a lead and whether that verification step appears in your report, not just the thermal photo itself.
Limitations and Environmental Factors That Affect Accuracy
Thermal imaging has real blind spots. Emissivity, which is how efficiently a material radiates heat, varies across brick, vinyl siding, wood, and drywall. A material with low emissivity can reflect ambient heat and mimic a thermal anomaly that is not actually there, which is part of why infrared thermography for delamination detection requires an inspector who understands surface material behavior, not just the camera itself.
Several environmental conditions commonly skew a scan:
- Direct solar gain heating one side of a wall faster than the rest
- Wind pulling heat unevenly across an exterior surface
- Swinging ambient temperatures between the morning and afternoon
- Surface dirt or grime changing how a material radiates heat
There is no single temperature-gradient threshold that reliably signals moisture across every climate and building type. Research comparing infrared thermography with other moisture-detection techniques found that effective thresholds shifted with humidity and ambient conditions, from temperature gradients that vary with environmental conditions. These are typically higher in humid, hot conditions and lower in cold ones. In practice, scans are most reliable in the early morning or evening, during stable weather, and after a meaningful day-night temperature swing has had time to show up on interior and exterior surfaces.
What the Inspection Report Will Show and Next Steps
A thermal finding in your report should never be a photo with no context. A useful report includes:
- Annotated thermal images with the location clearly marked
- A written explanation of what the pattern likely indicates
- The inspector’s confidence level, since some leads are stronger than others
- Recommended next steps, such as a moisture meter reading or a follow-up by a specialist
Some findings justify fast action. A moisture reading confirmed above normal range near a roof penetration, for instance, usually means scheduling a roofer within days, not months. Others call for monitoring, like a mild temperature variance in an attic that could simply reflect uneven insulation depth.
Depending on what turns up, your next call might be a moisture remediation contractor, a licensed electrician, or a roofer. Inspectors typically document the thermal evidence alongside photos and notes that buyers and agents can use directly in repair negotiations, which is where a documented request list becomes useful during closing.
Cost, Value, and When to Add a Thermal Scan
Thermal imaging add-ons for a residential inspection commonly run in the low hundreds of dollars, though the exact amount varies by region, home size, and whether the inspector owns a higher-end camera. It is worth treating as an add-on decision, not an automatic default.
Before booking, ask these questions:
- What is included in the scope, interior only, exterior only, or both
- What verification steps follow a flagged anomaly
- Can they show a sample report so you know what you are paying for
- What certifications or training back their thermal imaging work
A thermal scan tends to earn its cost when a home has visible water staining, a history of roof or storm damage, an older electrical panel, or finished attic space and concealed ductwork that a visual inspection cannot reach. It adds less value on a recently and comprehensively renovated home with open access to systems, or new construction still under a builder warranty. For a side-by-side look at what matters most when comparing inspectors, the inspection company selection criteria for homebuyers page covers the broader checklist.
Types of Thermal Cameras Inspectors Use and Their Trade-Offs
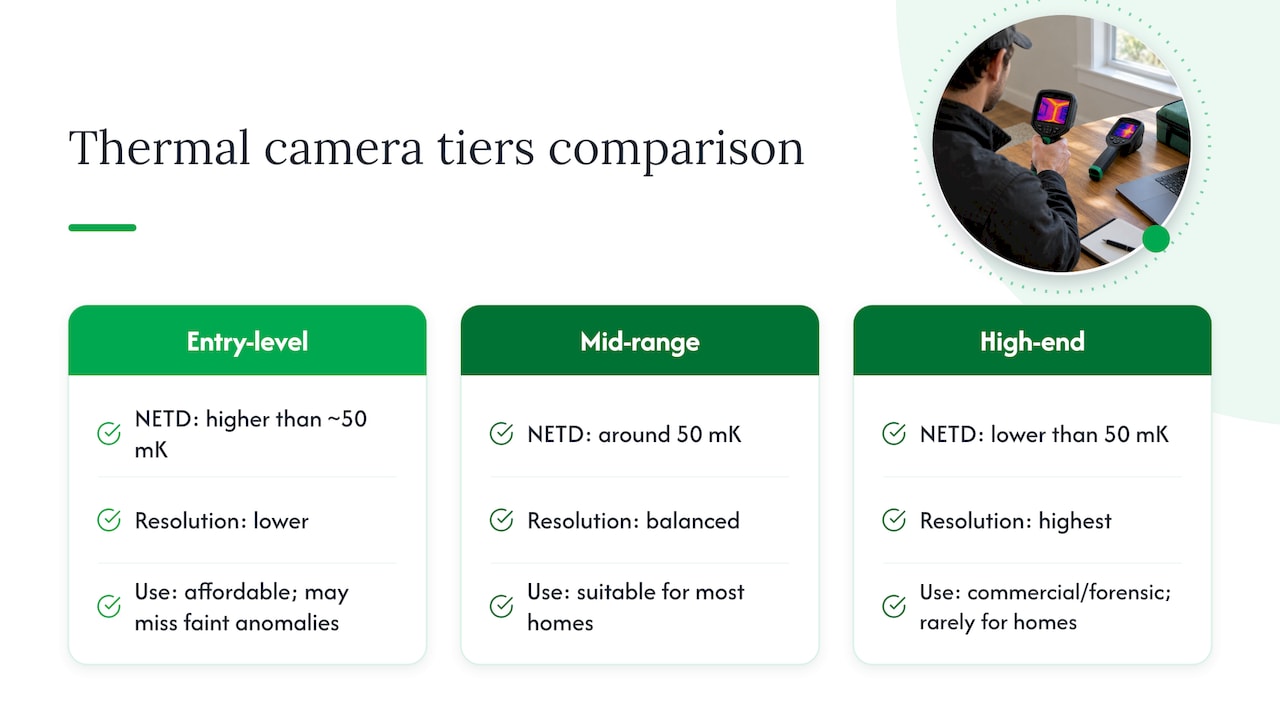
Not all thermal cameras perform the same, and the difference shows up in how reliably they catch subtle leads. The key specification is thermal sensitivity, measured as NETD, or noise-equivalent temperature difference. According to FLIR’s guidance on thermal sensitivity, a lower NETD, around 50 millikelvin or better, combined with adequate resolution, improves a camera’s ability to pick up small temperature differences relevant to moisture and insulation defects.
Entry-level handheld units are compact and affordable but often have higher NETD values and lower resolution, which can cause faint anomalies to wash out, especially at typical inspection distances across a room or attic. Mid-range professional cameras balance resolution and sensitivity well enough for most residential work, catching smaller thermal contrasts without the price tag of industrial-grade equipment. High-end models used in commercial or forensic building diagnostics offer the sharpest detail but are rarely necessary for a standard home inspection.
A buyer-facing comparison of handheld thermal camera options breaks down how resolution and sensitivity specs translate into real-world detection differences, which is useful context if you want to understand why one inspector’s equipment might catch something another’s misses. The camera matters, but so does the operator interpreting what it shows.
Preparation Steps Homeowners Should Take Beforehand
A thermal scan works best when the home is in a state that lets temperature differences show up clearly. A few simple steps on your end make the inspector’s job easier and the results more reliable.
Keep interior heating or cooling running normally in the days leading up to the inspection rather than shutting the system off to save money. A stable indoor-outdoor temperature differential is what makes thermal contrasts visible in the first place. Clear access to the attic hatch, electrical panel, and any areas with a history of leaks or dampness, since an inspector working around boxes or furniture loses scanning angles.
If you know about a past leak, previous repair, or an area that has felt drafty, mention it before the walkthrough starts. That context helps the inspector aim the scan rather than treating the whole house as a blank search. Avoid scheduling the inspection immediately after heavy rain or during unusually high wind, since both can distort surface readings temporarily. A short list like this takes a few minutes but can be the difference between a thermal scan that confirms something real and one that gets drowned out by noise.
Common False Positives and False Negatives to Watch For
Thermal imaging can point the wrong direction as easily as the right one, which is why a flagged pattern is a lead, never a verdict. A cold patch near a window might be a draft from poor weatherstripping rather than hidden moisture, and a warm streak on a ceiling might trace back to a recessed light fixture rather than a wiring fault.
False positives commonly come from reflected heat off glass or shiny metal surfaces, shadows cast by furniture or fixtures, and uneven sun exposure across a single wall. False negatives happen too: a slow, long-term leak that has partially dried can show little or no thermal contrast, and well-insulated walls can mask a moisture problem that would be obvious in an older, thinner assembly. Electrical hot spots carry their own wrinkle, since a connection’s temperature can shift depending on the electrical load at the moment of the scan, meaning a hot spot caught under heavy load might look normal on a quieter day.
This is exactly why a single infrared pass is not treated as conclusive. Combining the scan with moisture meter readings, a visual check, and sometimes short-term monitoring closes the gap between what the camera suggests and what is actually happening inside the wall or panel.
Standards and Certifications for Thermal Imaging Inspectors
Thermal imaging sits in an unusual spot in the inspection industry: useful, increasingly common, but not required. The ASHI Standard of Practice lists thermal imaging among the specialized equipment inspectors are not obligated to use during a standard inspection, which means its inclusion depends on the individual inspector’s training, equipment, and the scope you agree on.
That makes the inspector’s own background the real credential to check. Look for training specific to infrared thermography in building diagnostics, not just general home inspection licensing, since reading a thermal image correctly requires understanding building science fundamentals like thermal bridging and emissivity. Ask whether they have completed coursework or certification through a recognized inspection body, and ask how many thermal-assisted inspections they have performed. A camera in an inspector’s bag means little without the interpretation skill to back it up.
How to Read a Thermal Image as a Homeowner
You do not need formal training to get value from a thermal image in your report, but a few basics help you ask smarter questions. Color scales vary by camera, but generally, warmer colors like red and yellow indicate higher surface temperatures, while cooler colors like blue and purple indicate lower ones. The scale itself is relative to what else is in the frame, not an absolute measurement you can compare across different photos.
Look at the context notes next to each image rather than the color pattern alone. A blue patch near a bathroom exhaust vent means something different than the same blue patch on an exterior wall with no plumbing nearby. Ask your inspector to walk you through what they believe caused each flagged pattern and what verification step, if any, they took or recommend. A thermal image without that explanation is just a colorful photo, not an inspection finding.
How Hunt Home Inspection Puts Thermal Imaging to Work
In practice, a thermal lead only matters when it is paired with a verification step and documented clearly. Flagged anomalies are followed up with moisture meter readings and findings are logged through a Create Request List™, so buyers and agents have a clear, shareable record for repair negotiations. Reports come back within 24 hours, and both in-person and video walkthroughs are offered. The focus stays on clients who need findings explained in plain terms, not jargon.
— JOHN
Ready to Add Thermal Imaging to Your Inspection?
If a thermal-enhanced inspection sounds like the right call for your home, it is simple to schedule one alongside your standard inspection. Evening and weekend appointments plus video walkthroughs may be available for buyers who cannot be on site, and reports generally aim to come back quickly so you are not stuck waiting during a tight closing timeline.

Visit our inspection services page to see the full range of add-ons, or review our inspection company selection criteria if you are still comparing inspectors before you book.
FAQ
Is thermal imaging worth it for a home inspection?
It is worth it when a home has risk factors like water staining, storm history, an older electrical panel, or concealed ductwork, since those are exactly the conditions where hidden issues are likely. On a recently renovated or new-construction home with full system access, the add-on often brings less value.
What is the biggest red flag in a home inspection?
There is no single universal red flag, since the most serious finding depends on the home, but issues tied to structural integrity, active water intrusion, or electrical safety typically draw the most attention from inspectors. A thermal scan can help surface these issues earlier by pointing to areas that need closer, hands-on verification.
How much does a thermal imaging inspection cost?
Pricing for a thermal imaging add-on varies by region, home size, and inspector, typically falling in the low hundreds of dollars on top of a standard inspection fee. Ask your inspector directly for their current pricing, since it is not standardized across the industry.
Is a thermal imaging survey worth the extra step?
A thermal survey adds real value as a diagnostic lead generator, especially for moisture, insulation gaps, and electrical hot spots that are invisible during a standard visual walkthrough. Its worth depends on verification, since the scan alone does not confirm a problem, only points toward one that still needs a moisture meter reading, an electrician’s assessment, or a closer look.
Sources
- A Review of Infrared Thermography for Delamination Detection on Infrastructures and Buildings
- ASHI’s HOME INSPECTION STANDARD OF PRACTICE FOR THE HOME INSPECTION PROFESSION
- The importance of thermal sensitivity for detection accuracy — FLIR
Recent Comments