A pre-listing inspection is defined as a home inspection ordered by the seller before the property goes on the market, producing a condition report ahead of any buyer offers. Unlike a buyer’s inspection, which happens after an offer is accepted, this one gives you control over the timeline. A licensed inspector evaluates the home’s major systems, delivers a written report within 1–2 days, and hands you the information you need to price, repair, or disclose with confidence. Think of it as your preview of what buyers will eventually find anyway.
How does a pre-listing inspection work?
The inspection process follows the same standards as a typical buyer’s inspection. A licensed inspector walks the property and evaluates major systems: roof, plumbing, electrical, HVAC, foundation, and structural components. The seller hires and pays the inspector, and the listing agent often coordinates the scheduling.

The visit itself takes 2–4 hours for most homes. Larger or older properties may run longer. After the walkthrough, the inspector compiles a written report, usually delivered within 1–2 days. That report becomes your roadmap for what to fix, what to disclose, and how to price.
Inspection costs typically fall between $300 and $500 for most homes, with higher fees for larger square footage, older construction, or added specialty tests like radon, mold, or sewer scoping. The scope is flexible. You can request a full inspection or limit it to specific systems if budget is a concern.
- Hire a licensed inspector with verifiable credentials and local market experience.
- Schedule the inspection 4–6 weeks before your target listing date to allow time for repairs.
- Be present during the inspection. Ask questions and take notes directly from the inspector.
- Review the report carefully before sharing it with your agent or potential buyers.
- Decide which repairs to complete, which to disclose as-is, and which to reflect in your asking price.
Pro Tip: Ask the inspector to walk you through the report in person or by phone. Inspectors flag items by severity, and understanding the difference between a safety issue and a cosmetic note changes how you prioritize your repair budget.
What are the benefits and limitations for sellers and buyers?
The core value of a pre-listing inspection is placing sellers in a position of knowledge before negotiations begin. You know what the house needs. That removes the anxiety of waiting for a buyer’s inspector to surface a surprise that kills the deal two weeks before closing.
Sellers gain several concrete advantages:
- Earlier problem identification: You find issues on your schedule, not the buyer’s.
- Cost control: You choose the contractor and the timeline, avoiding rushed repair markups.
- Stronger pricing strategy: You can price the home accurately or adjust for known defects upfront.
- Buyer confidence: Sharing a clean or repaired inspection report signals transparency and reduces hesitation.
- Faster closings: Fewer surprises after offer acceptance means fewer renegotiations and cancellations.
The limitations are real, though. A pre-listing inspection does not replace the buyer’s own inspection. Inspections are visual and noninvasive by nature, so hidden issues behind walls or under slabs may go undetected. Buyers who rely solely on a seller-provided report to waive their inspection contingency take on real risk.
“Pre-listing inspection reports, when properly structured and disclosed, serve as powerful negotiation tools, promoting predictable outcomes and smoother dealings.” — The Home Inspection Report as a Negotiation Document
There is also a legal dimension. In many states, receiving an inspection report creates actual knowledge of defects, which triggers disclosure obligations. Washington State’s Form 17 is a direct example: once you know about a defect, you must disclose it accurately. Sellers who skip the pre-listing inspection sometimes do so specifically to avoid this obligation, but that strategy carries its own risks if issues surface later.
Even after a thorough pre-listing inspection, buyers may still request repairs or credits following their own inspection. The pre-listing report reduces surprises but does not eliminate negotiation.
How does a pre-listing inspection differ from a buyer’s inspection?
Both inspections cover the same components and follow the same professional standards. The difference is timing, purpose, and who holds the report.
| Factor | Pre-Listing Inspection | Buyer’s Home Inspection |
|---|---|---|
| Who orders it | Seller | Buyer |
| When it happens | Before listing | After offer acceptance |
| Who pays | Seller or listing agent | Buyer |
| Primary purpose | Prepare seller, inform pricing | Inform purchase decision |
| Report ownership | Seller controls disclosure | Buyer owns and controls |
| Impact on deal | Reduces surprises pre-offer | Can trigger contingency or renegotiation |
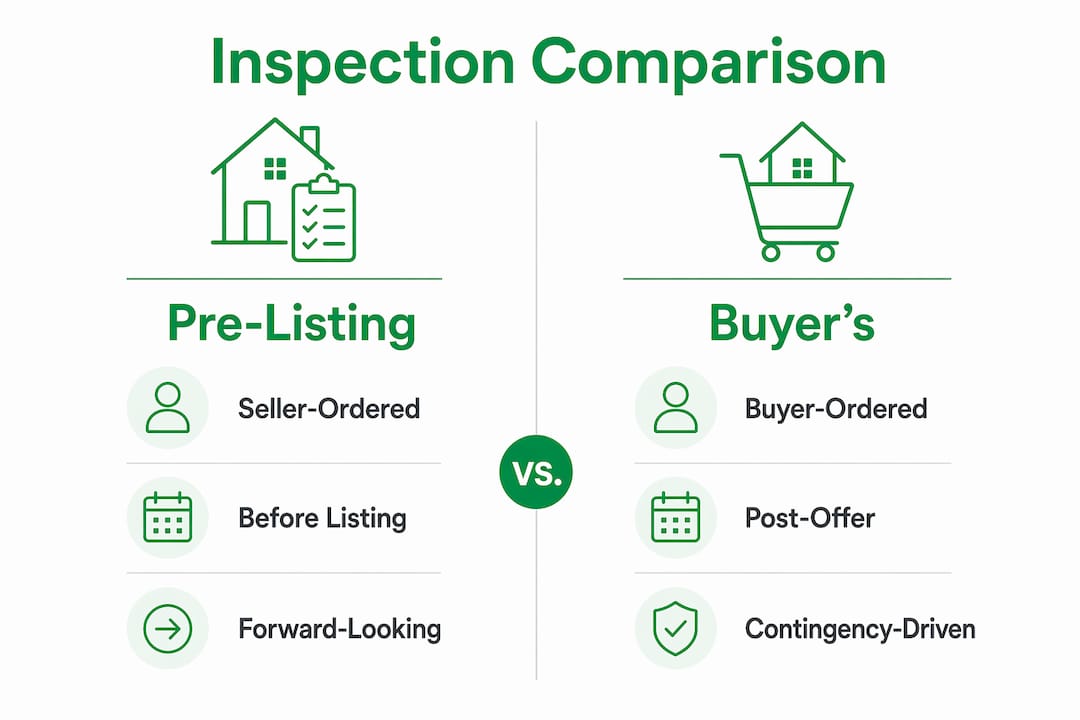
The pre-listing inspection is seller-initiated and forward-looking. The buyer’s inspection is contingency-driven and backward-looking. Both serve the transaction, but they serve different parties at different moments.
Pro Tip: If you complete a pre-listing inspection and make documented repairs, share the contractor invoices alongside the inspection report. Buyers and their agents respond better to evidence of completed work than to verbal assurances.
Pre-listing inspection checklist: practical tips for sellers
Sellers should treat the inspection report as a triage document, not a to-do list for every item flagged. Prioritize safety issues and major defects first. Fixing every minor cosmetic issue rarely delivers strong return on investment and can delay your listing date unnecessarily.
Here is a practical checklist to work through before and after your inspection:
- Before the inspection: Clear access to the attic, crawl space, electrical panel, water heater, and HVAC equipment. Inspectors cannot evaluate what they cannot reach.
- After the report: Categorize findings into three groups: safety or structural issues, functional defects, and cosmetic items. Address the first group before listing.
- Repair documentation: Keep every contractor invoice, permit, and receipt. Proper documentation reduces negotiation disputes after an offer comes in.
- Disclosure timing: Schedule your inspection close to your listing date. Aligning inspection timing with disclosure forms helps you manage legal obligations without leaving a gap between what you know and what you report.
- Specialty tests: Consider radon testing, sewer scoping, or mold sampling if your home’s age or location makes those risks likely. Buyers in your market may request them anyway.
- Inspector selection: Hire a licensed inspector with experience in your home’s age and construction type. Ask for a sample report before booking so you know what level of detail to expect.
One often-overlooked step is reviewing your state’s disclosure form before the inspection happens. Knowing exactly what questions you will need to answer helps you understand which findings carry legal weight and which are informational only.
Pro Tip: Do not attempt repairs on major systems like electrical or HVAC without licensed contractors. Unpermitted or amateur repair work can surface in a buyer’s inspection and create bigger negotiation problems than the original defect.
Key takeaways
A pre-listing inspection gives sellers documented knowledge of their home’s condition before buyers ever make an offer, which is the single most effective way to control the transaction timeline.
| Point | Details |
|---|---|
| Definition and timing | A pre-listing inspection is seller-ordered before listing, unlike a buyer’s inspection after offer acceptance. |
| Cost range | Most pre-listing inspections cost $300–$500, with higher fees for larger or older homes. |
| Disclosure obligations | Receiving an inspection report creates legal knowledge of defects, triggering disclosure requirements in many states. |
| Triage approach | Prioritize safety and structural repairs first; fixing every minor item rarely improves negotiation outcomes. |
| Buyer re-inspection | Buyers commonly conduct their own inspections regardless, so sellers should keep repair documentation ready. |
Why pre-listing inspections change the seller’s negotiating position
I have seen sellers walk into listing appointments convinced their home is in great shape, only to watch a deal collapse three weeks later when a buyer’s inspector found a failing HVAC unit or active roof leak. That scenario is almost always avoidable.
The pre-listing inspection does not guarantee a smooth sale. What it does is remove the information asymmetry that makes real estate negotiations so unpredictable. When you know what your home needs before buyers do, you set the terms of the conversation. You decide what to fix, what to price in, and what to disclose. That is a fundamentally stronger position than reacting to a buyer’s inspector’s findings under contract pressure.
The misunderstanding I see most often is sellers treating the pre-listing report as a marketing document. It is not. It is a legal and strategic tool. Sharing a report that shows completed repairs with contractor invoices attached is powerful. Sharing a report full of unaddressed defects and hoping buyers overlook them is not a strategy.
My honest advice: do not skip the pre-listing inspection to avoid disclosure obligations. In states with knowledge-based disclosure laws, that approach creates more legal exposure than it avoids. Get the inspection, fix what matters, document everything, and price the rest accordingly. That is how you get to closing without drama.
— JOHN
Get a professional pre-listing inspection in st. louis
Sellers in the St. Louis Metro area and Southern Illinois trust Jhunthomeinspections to deliver thorough, licensed inspections with reports returned within 24 hours. Whether you need a full pre-listing inspection or a targeted review of specific systems, Jhunthomeinspections covers every major component and gives you a clear, organized report you can act on immediately.
Jhunthomeinspections also offers the Create Request List™, a proprietary tool that simplifies communication between sellers, buyers, and agents after the report is delivered. If cost flexibility matters, the pay at close option lets you schedule your inspection now without paying out of pocket before your sale closes. Book your inspection today and go to market with confidence.
FAQ
What is a pre-listing inspection in real estate?
A pre-listing inspection is a home inspection ordered by the seller before the property is listed for sale. A licensed inspector evaluates major systems and delivers a written report, giving the seller documented knowledge of the home’s condition ahead of buyer offers.
How much does a pre-listing inspection cost?
Most pre-listing inspections cost between $300 and $500. Larger homes, older construction, and added specialty tests like radon or sewer scoping push costs higher.
Does a pre-listing inspection replace the buyer’s inspection?
No. Buyers typically conduct their own inspections after an offer is accepted. A pre-listing inspection reduces surprises but does not eliminate the buyer’s right to inspect or renegotiate based on their own findings.
What does a pre-listing inspection checklist cover?
A standard pre-listing inspection covers the roof, foundation, plumbing, electrical, HVAC, and structural components. Sellers should also clear access to the attic, crawl space, and utility systems before the inspector arrives.
Do sellers have to disclose pre-listing inspection findings?
In most states, receiving an inspection report creates legal knowledge of defects, which triggers disclosure obligations. Sellers should review their state’s disclosure requirements and consult their listing agent or attorney before deciding what to share.
Recent Comments