Budget home inspection options are professional visual screenings of a property’s structural and mechanical systems, typically priced between $300 and $500 for most U.S. homes. For buyers and renters working with tight margins, these inspections represent the single most cost-effective tool for identifying hidden defects before signing a contract. The standard approach combines a general visual inspection with selective specialty add-ons, chosen only when the general inspection flags a specific risk. Jhunthomeinspections serves buyers across the St. Louis Metro area and Southern Illinois with exactly this kind of flexible, layered approach.
1. What’s included in a standard budget home inspection
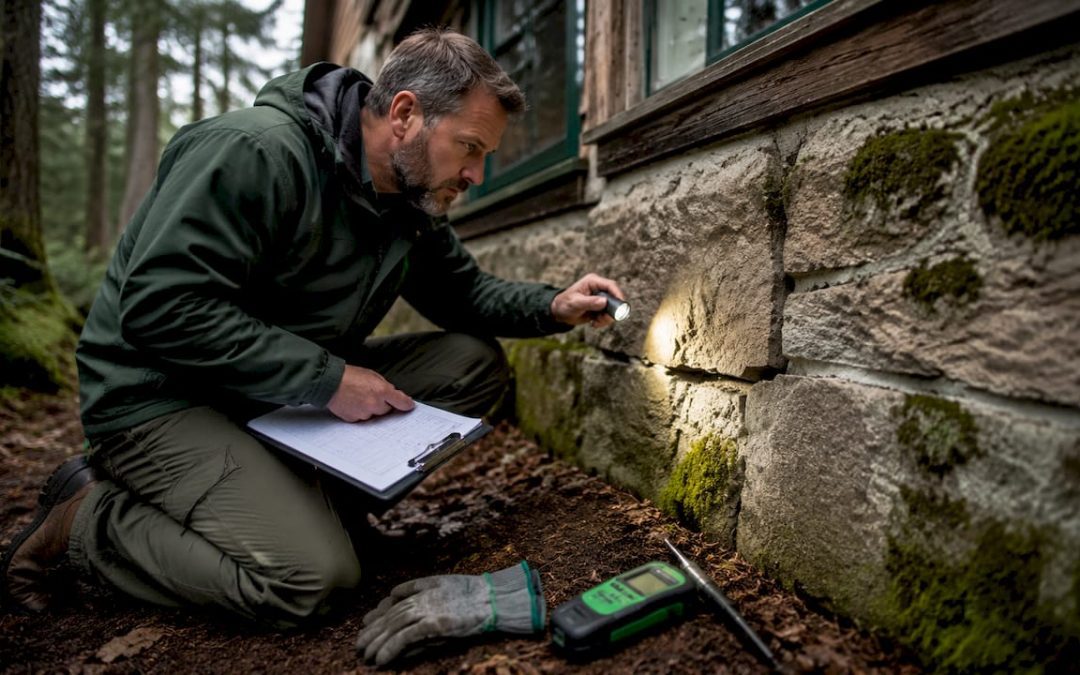
A standard budget inspection is a visual, non-invasive evaluation of a home’s major structural and mechanical systems. The inspector walks through the property and assesses the roof, foundation, electrical panel, plumbing, HVAC, windows, and doors. Nothing is torn open, moved, or tested for air quality.
That scope limitation is deliberate, not a flaw. Inspectors do not open walls, lift flooring, or reposition stored furniture. They flag what they can see and document it with photos. If something warrants deeper investigation, they recommend a specialist.
The practical value of this approach is that it catches the majority of visible defects at a fraction of the cost of a full engineering assessment. A buyer who understands what a general inspection covers and what it excludes can make smarter decisions about which add-ons are worth the extra spend.
Pro Tip: Ask your inspector for a prioritized defect list with photos, not just a narrative report. A clear, documented defect report tells you exactly where to focus your follow-up budget.
2. Top affordable home inspection types and add-ons to consider
The general inspection is your baseline. Every other test is conditional. Here is how the most common affordable inspection types stack up:
General home inspection: Covers structural, mechanical, and safety systems. This is the non-negotiable starting point for any buyer.
Radon test: Radon is a colorless, odorless gas that accumulates in basements and lower floors. Specialty tests like radon typically run $30 to $150 and are worth adding if the property has a basement or is in a high-radon region.
Termite and WDO inspection: Wood-destroying organism inspections cost roughly $75 to $200. Lenders in many states require them, and older homes in humid climates make them a smart conditional add-on.
Septic inspection: If the property uses a private septic system, budget $300 to $700 for a dedicated inspection. Failing septic systems are among the most expensive surprises a buyer can face after closing.
Sewer scope: A camera inspection of the main sewer line costs $100 to $300 and is particularly relevant for homes built before 1980, when clay or cast-iron pipes were standard.
HVAC inspection: A dedicated HVAC technician can assess system age, efficiency, and remaining lifespan in ways a general inspector cannot. Expect $75 to $150 for a focused evaluation.
The smartest budget strategy is to add specialty inspections conditionally, triggered by what the general inspection reveals, rather than ordering everything upfront. A general inspector who finds no evidence of moisture intrusion gives you reasonable grounds to skip the sewer scope. One who flags foundation cracks or active water staining gives you every reason to call a specialist.
Pro Tip: DIY photo-based apps like Home Inspect can generate a quick condition snapshot before your formal inspection. Use them to prepare questions for your inspector, not as a substitute for professional evaluation.
3. Comparing traditional on-site inspections vs. remote and DIY options
The table below summarizes the key differences between the three main inspection modalities available to budget-conscious buyers.
| Inspection type | Cost range | Coverage | Best use case |
|---|---|---|---|
| In-person professional | $300 to $500+ | Full structural and mechanical | Primary purchase decision |
| Remote/virtual inspection | Lower upfront cost | Camera-visible systems only | Pre-screening or fast closings |
| DIY photo-based app | Minimal to free | Surface conditions only | Preliminary self-assessment |
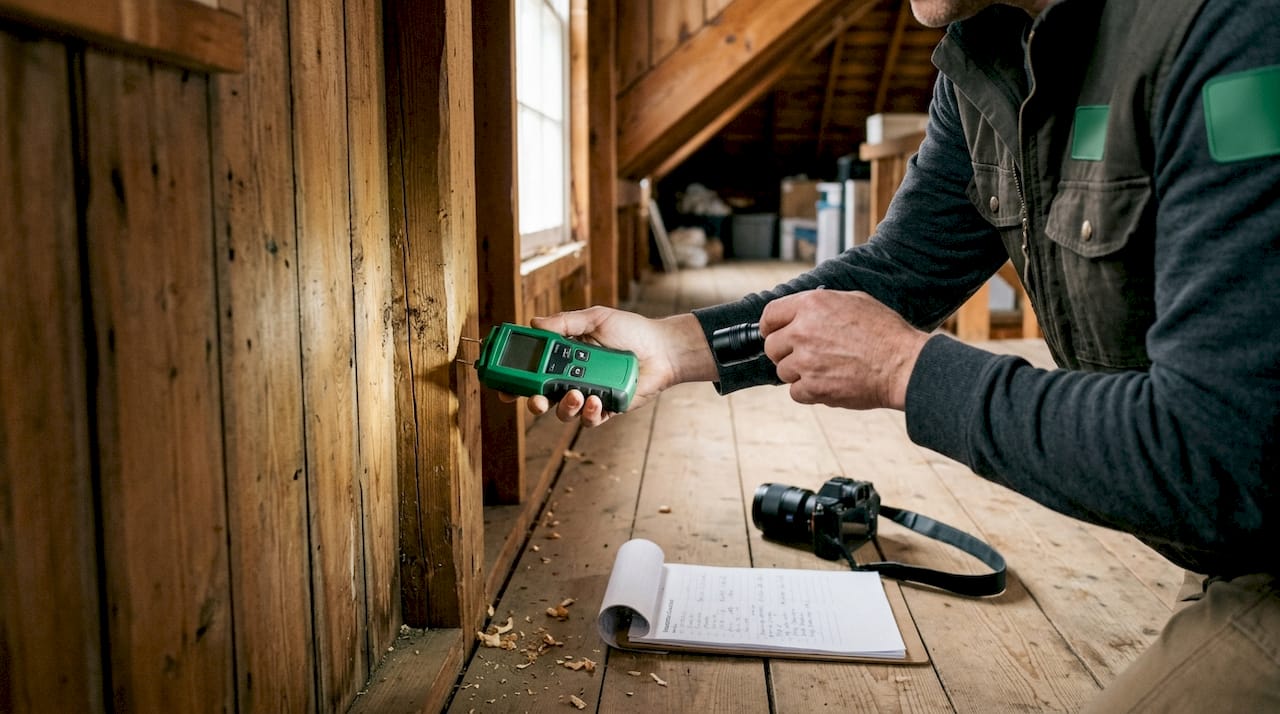
In-person inspections remain the gold standard because a trained inspector physically moves through the property, checks attic access, tests outlets, and assesses conditions that no camera angle fully captures. The home inspection process for an average home takes two to four hours and produces a documented report.
Remote virtual inspections work well for specific, camera-visible equipment checks and for buyers who cannot be present in person. Jhunthomeinspections offers video inspections precisely for this reason, particularly useful for out-of-state buyers or situations where in-person access is restricted. The limitation is coverage. A video walkthrough cannot assess structural movement, hidden moisture, or the condition of systems behind walls.
DIY apps produce condition-rating PDFs quickly and at minimal cost. They are useful for a preliminary self-assessment before scheduling a professional, but they lack professional evaluation standards and carry no liability protection for the buyer.
Pro Tip: If a remote inspection surfaces any red flag, transition immediately to an on-site professional inspection before proceeding. Virtual inspections with Vuspex and similar platforms are explicit that camera-based reviews are not substitutes for physical assessments when concerns arise.
4. How to get the most value when budgeting for home inspections
Maximizing your inspection budget starts before the inspector arrives. Here are the practices that separate buyers who get full value from those who overpay or miss critical issues.
Ask upfront about scope and total cost. Clear communication about inclusions, cost, and report delivery is the single most effective way to avoid surprise charges. Ask specifically what is excluded and what triggers a specialist referral.
Request a prioritized defect list with photos. A narrative report that lists 47 items without ranking them is nearly useless for decision-making. A report that separates safety hazards from cosmetic issues gives you a negotiating tool and a spending roadmap.
Compare price alongside scope and documentation quality. The cheapest inspection is not the best deal if the report lacks photos, excludes key systems, or fails to note limitations. Best budget inspection practices require evaluating what you get for the price, not just the price itself.
Never waive an inspection to save money. Skipping inspections shifts full repair responsibility to the buyer and removes your ability to negotiate credits. If a competitive market pressures you to waive, discuss a home warranty or inspection contingency with your agent as an alternative.
Budget based on property specifics. A 1,500 square foot home built in 2010 carries a very different risk profile than a 3,500 square foot home built in 1965. Inspection costs scale with size and complexity, and older homes almost always warrant at least one specialty add-on.
5. Situational recommendations for different types of buyers
Not every buyer faces the same risks or constraints. Here is how to match your inspection strategy to your specific situation.
First-time buyers on a tight budget: Start with a general inspection and add radon testing if the property has a basement or sits in a high-radon zone. Add a termite inspection if the home is older or located in a humid climate. These two add-ons cover the most common hidden risks at the lowest incremental cost.
Properties with septic systems or well water: A general inspection will not evaluate either system in depth. Budget for a dedicated septic inspection ($300 to $700) and a water quality test ($100 to $300). Skipping these on rural or semi-rural properties is one of the most common and costly mistakes buyers make.
Renters or buyers in fast-closing situations: Remote or virtual inspections offer a practical pre-screening option when time is short. Jhunthomeinspections provides video inspection services for exactly these scenarios. Treat the remote inspection as a filter, not a final answer, and escalate to an in-person inspection if anything looks questionable.
Buyers of older homes (pre-1980): Prioritize a sewer scope, lead paint awareness, and an HVAC evaluation alongside the general inspection. Homes from this era frequently have aging infrastructure that a general inspection will flag but not fully quantify.
Buyers with more flexibility in their budget: A comprehensive inspection that includes the general assessment plus radon, termite, and sewer scope gives you the most complete picture. The inspection services offered by Jhunthomeinspections are designed to let buyers add these layers without committing to an all-in bundle upfront.
Key takeaways
The most cost-effective approach to home inspections combines a general visual inspection with conditional specialty add-ons triggered by specific property risks, not purchased as a default bundle.
| Point | Details |
|---|---|
| Start with a general inspection | A $300 to $500 visual inspection covers structural and mechanical systems and sets the baseline for all further decisions. |
| Add specialty tests conditionally | Radon, termite, septic, and sewer scope tests should be triggered by general inspection findings, not ordered automatically. |
| Never skip the inspection | Waiving inspections transfers full repair liability to the buyer and eliminates negotiating leverage. |
| Remote inspections have real limits | Virtual and DIY options work for pre-screening but cannot replace a physical walkthrough for purchase decisions. |
| Documentation quality matters | A prioritized defect list with photos is more valuable than a long narrative report without clear rankings. |
What I’ve learned about inspection budgets after years in the field
I have seen buyers spend $800 on a bundled inspection package that included tests they never needed, and I have seen buyers spend $300 on a general inspection that missed a $15,000 septic failure because no one thought to ask about the system. Both outcomes were avoidable.
The buyers who get the most from their inspection budget are the ones who treat it as a staged process. They start with the general inspection, read the report carefully, and then decide which specialty tests the findings actually justify. They ask their inspector direct questions: What did you see that concerned you most? What would you test next if this were your house?
The risk of false economy is real. A cheap inspection that produces a vague, undocumented report gives you a false sense of security. A slightly more expensive inspection with a clear, photo-documented defect list gives you a negotiating tool worth multiples of its cost. The first-time buyer’s guide we put together at Jhunthomeinspections covers this distinction in detail, because it is the single most common source of post-closing regret I encounter.
My honest recommendation: never treat the inspection fee as a line item to minimize. Treat it as the cheapest form of due diligence available to you. A $400 inspection that prevents a $20,000 repair surprise is not a cost. It is a return.
— JOHN
How Jhunthomeinspections helps budget-conscious buyers
Jhunthomeinspections serves buyers across the St. Louis Metro area and Southern Illinois with affordable inspection packages designed for first-time buyers, veterans, and low-income families. Every inspection includes a detailed report delivered within 24 hours, complete with photos and a prioritized defect list.
The team offers both in-person and video inspections, so buyers who need flexibility do not have to sacrifice thoroughness. Specialty add-ons like radon, termite, and sewer scope are available as conditional services, not forced bundles. If you want transparent pricing and a certified inspector who explains every finding in plain language, Jhunthomeinspections is the right starting point. You can also explore the pay at close option if upfront inspection costs are a concern.
FAQ
What does a budget home inspection typically cost?
Basic home inspections cost roughly $300 to $500 in the U.S., with smaller homes under 1,500 square feet running closer to $250 and larger homes over 4,000 square feet exceeding $500. Specialty add-ons like radon or termite tests are priced separately.
What is not covered in a standard affordable home inspection?
Standard inspections are limited to visible, non-invasive assessments and exclude air quality testing, wall or floor openings, and evaluation of systems hidden behind finished surfaces. Buyers should ask their inspector specifically what is excluded before booking.
Should I waive a home inspection to compete in a hot market?
Waiving inspections transfers all repair liability to the buyer and removes negotiating leverage. A better alternative is to discuss an inspection contingency or a home warranty with your agent rather than skipping the inspection entirely.
When do I need specialty inspections beyond the general one?
Specialty inspections like septic, sewer scope, or radon should be added based on triggers from the general inspection and property context. Homes with private septic systems, basements, or pre-1980 construction almost always justify at least one targeted add-on.
Are remote or virtual home inspections reliable?
Remote inspections are useful for pre-screening and fast-closing situations but carry real coverage limitations. Video-recorded remote inspections work well for camera-visible systems and should transition to an in-person inspection if any red flags appear.
Recent Comments